Collection Before And After

interior design house, house interior design ideas, interior house plans, interior house painting, interior house painting, interior design of a house interior of house, interior of house, interior house designs photos, interior house design, interior house design, interior house ideas, modern house interior

Collection Before And After

interior design house, house interior design ideas, interior house plans, interior house painting, interior house painting, interior design of a house interior of house, interior of house, interior house designs photos, interior house design, interior house design, interior house ideas, modern house interior

Collection Before And After

interior design house, house interior design ideas, interior house plans, interior house painting, interior house painting, interior design of a house interior of house, interior of house, interior house designs photos, interior house design, interior house design, interior house ideas, modern house interior

Collection Before And After

interior design house, house interior design ideas, interior house plans, interior house painting, interior house painting, interior design of a house interior of house, interior of house, interior house designs photos, interior house design, interior house design, interior house ideas, modern house interior

Collection Before And After

interior design house, house interior design ideas, interior house plans, interior house painting, interior house painting, interior design of a house interior of house, interior of house, interior house designs photos, interior house design, interior house design, interior house ideas, modern house interior

Showing posts with label hand tools. Show all posts

Monday, August 22, 2011

Hand Planes

It has been a while since my last post. Life has been interesting the last few years and I've had very little time for woodworking or the money for that matter. It's an expensive hobby. However it is one that I love so I try and do little bits here and there. The latest project I completed was a set of Hand Planes. In a recent issue of
Wood Magazine they had an article on making your own hand plane. I have wanted to do one of these for a LONG time and really enjoy making my own tools and jigs etc. I'm finding the jig side of things is going to be very helpful in building guitars. Anyway. I thought I would share my hand planes with you. Hope you enjoy. Oh and you should see a new logo on the blog now. I like it much better.


We start by gluing up the blank for the hand plane. It's roughly 2"x8"


All the parts next to each other


Cut the bed out for the blade. That center triangle later becomes the wedge.


Gluing all the parts together.


Glued up and ready to cut the wedge.


Bottom of the plane with the throat opened


Test fitting everything


The Wedge is now cut out.


After everything was shaped and tuned


The woods are Spalted Maple, Sapele, Walnut and some oak veneer in between


Here is the two that I have built so far.  The one in Front is Curly Maple Sapele and Oak.


Both planes work beautifully and I couldn't be happier

--Grover

Thursday, April 29, 2010

Jelly Cupboard Build Update

Now that I have had some time in the shop I started working on the Jelly Cupboard Build again.  I need to get that out of the shop so I can get reorganized and cleaned up to start the WIWW nightstand/beach house nightstand. 

I thought I would post a few pics of that I was able to get done tonight. 

IMG_3880_1024x768

This is part of the door frame.  It is constructed with a half lap joint.  There are a couple of ways to accomplish this joint.  There are two ways specifically to accomplish this on a table saw (Well Two ways that I know of I am sure there other ways) one is to use a Dado Set which I have loaned out currently, the second and the way that I accomplished this is to use your regular blade and nibble away that the wood. 

Essentially I like to figure out the width of my cut set my fence that width and make my first cut.  Now if you do this make sure you use your miter gauge with a sacrificial fence, this does a couple of things.  It provides support to the back of the wood as well as giving you some additional support on the board you are cutting.  I make my first cut with the wood against the fence just touching not real tight on the fence you don’t want to cause a bind or have it kick on you.  Now with the first cut made I move the board just a hair to the left to let the blade nibble away at the next piece and then rinse and repeat until I get to the last cut.  You will need to do some clean up. 

If you look at the board you probably missed some pieces if they are large pieces you can line them up with the blade and cut them out.  If they are just fragments of wood hanging there your best bet is a piece of sand paper a 1/4 sheet sander or even a block plane.  I opted for the block plane because I have geeked out on using hand tools as much as I can lately.  I guess you could use a chisel as well. 
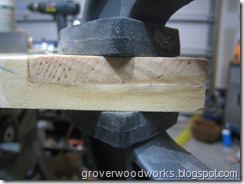
IMG_3881_1024x768

Once you have nibbled away at both the boards you will have a joint that looks similar to the one seen here.  Now you can see why it’s called a half lap joint.  This is a pretty neat Joint and I can see using this in future projects.

As you can see in the previous picture I also drilled a couple of holes for dowels.  They are supposed to help reinforce the joint.  With modern glue I don’t really think there is a need for reinforcement however from a cosmetic aspect they fit well with this piece. 
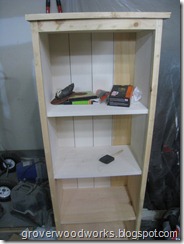
 

IMG_3882_1024x768

Here is a quick shot of the body of the cupboard.  I had some time to paint part of the inside.  I need to finish that up.  Obviously the inside will be white and the outside is going to be a grayish/green color.  Should be interesting.  I am doing it all with milk paint.  I will do a post on that at some point as it is somewhat different than regular paint. 

At this point I need to finish up the door frame and cut the hinge mortise and get everything mounted.  Mrs. Grover will be doing the punched tin for the door.  I’m hoping i can get her setup this weekend and get that knocked out. 


Have a Great Day!

Thursday, April 22, 2010

I’m in Love

Yes I am in love with my wife and have been for a long time.  Well before we were married and well before we even started dating but that’s a whole different story for a different blog.  What I am in love with is a tool.  An “antique” tool at that.  A few weeks ago I bought a couple of Hand Planes because I wanted to learn how to use them.  I am in this whole I want to learn to use hand tools kick.  I am teaching my self to hand cut dovetails.  That is tough.  It’s going to be a while and I know I am going to have to upgrade saws.  I bought a cheap one and there is a reason that it is cheap, but enough about that.  This is what I have fallen in love with

IMG_3751_1024x768 IMG_3752_1024x768


I have not had much of a chance to really research this particular hand plane.  It has a Stanley blade but I am not sure if that makes it a Stanley or not.  I will be scouring the internets for more information on this tool.  I actually bought this one and a smaller one.  I need to figure out what they are.  I will say that I read enough to figure out how to set the blade and went at the top of my jelly cupboard.  There was a little bit of a lip on the seam of the two boards and I was going to run it through the power planer but this hand plane was just calling out to me Use me Grover, use me.  Who am I to deny the will of the tool.  It knows best.  Well, after some playing and really hoping I didn’t screw my top up I had the seam on both sides leveled and the top looking awesome. 

It was amazing and a very beautiful thing to see those ribbons of wood just coming off the top.  It was almost magically and man did I work up a sweat.  I had like a whole Roy Underhill moment only he uses even older tools. 

I honestly never thought that I would be so infatuated with a hand tool but it was amazing.  I wanted to keep going and keep working the top but I didn’t want to take it down to far. 

I know I have a long way before I become proficient with the tool and have to figure out the sharpening of the blade and what exactly all of it does and the in’s and outs of using hand planes.  It’s exciting and best of all I only spent $25 on the pair of them.  I will get some shots of the smaller plane. 

Let me know about your experiences with hand tools, I’ve been a power tool guy and this is a new journey in woodworking for me.  Hopefully we can learn something together. 

Have a Great Day!

Saturday, March 6, 2010

Let the tool hunt begin….

Today my wife, son and I are headed to the International Antiques and Collectibles Show.  I am on the hunt for some antique tools.  I am mainly looking for some hand planes maybe a couple of hand drills and pretty much any other thing I can find.  I am really looking forward to this.  I am hoping to find some good deals and can’t wait to restore these tools back to pristine condition.  It will also give me a chance especially with the hand planes to hone (you guys see what I did there) my sharpening skills.  I can honestly say when I was a kid I never thought I would look forward going to antique show.  My how a little bit of time changes things. 

I am kind of on this hand tool kick and want to get some of the older tools to give them a whirl.  I am a huge fan of Roy Underhill he is an amazing craftsman.  I can only hope to achieve half the skill that he has gained over his years of woodworking.  He has a school in Durham and I really hope to be able to take some classes with him and some of his other instructors.  I hate that I live 3.5hrs away.  I however will not let that stop me. 

Anyway…  I have been told that it is time to get ready and go….  I will post any great finds that I happen upon. 

Have a Great Day!


Related Posts Plugin for WordPress, Blogger...